React Native Bottom Tab Icon 적용하기 DEV / REACT NATIVE
2020-07-30 posted by sang12
React Native Navigation과 react-native-vector-icons을 이용하여 안드로이드 bottom tab에 이미지를 넣어보겠습니다.
일단 tab과 아이콘을 사용하기 위해 모듈을 설치해봅시다 :)
@react-navigation/bottom-tabs
@react-navigation/native
react-native-safe-area-context
react-native-screens
react-native-vector-icons
그리고 vector-icons를 사용하기 위해선 android/app/build.gradle 해당 파일에 아래처럼 추가 해줍니다. 추가안해주면 이미지가 안나와요 :(
project.ext.vectoricons = [
iconFontNames: [ 'Ionicons.ttf', 'FontAwesome.ttf' ]
]
apply from: "../../node_modules/react-native-vector-icons/fonts.gradle"
-App.js
import * as React from 'react';
import { Text, View } from 'react-native';
import { NavigationContainer } from '@react-navigation/native';
import { createBottomTabNavigator } from '@react-navigation/bottom-tabs';
import HomeScreen from './screens/HomeScreen.js';
import StatisticsScreen from './screens/StatisticsScreen.js';
import SettingsScreen from './screens/SettingScreen.js';
import Icon from 'react-native-vector-icons/Ionicons';
const Tab = createBottomTabNavigator();

export default function App() {
  return (
    <NavigationContainer>
      <Tab.Navigator
        screenOptions={({ route }) => ({
          tabBarIcon: ({ focused, color, size }) => {
            let iconName;

            if (route.name === '메인') {
              iconName = focused ? 'beer' : 'beer-outline';
            } else if (route.name === '통계'){
              iconName = focused ? 'podium' : 'podium-outline';
            } else if (route.name === '설정'){
              iconName = focused ? 'settings' : 'settings-outline';
            }

            // You can return any component that you like here!
            return <Icon name={iconName} size={size}  color={color}/>;
          },
        })}
        tabBarOptions={{
          activeTintColor: 'black',
          inactiveTintColor: 'gray',
        }}
      >
        <Tab.Screen name="메인" component={HomeScreen} />
        <Tab.Screen name="통계" component={StatisticsScreen} />
        <Tab.Screen name="설정" component={SettingsScreen} />
      </Tab.Navigator>
    </NavigationContainer>
  );
}import * as React from 'react';
import { Text, View } from 'react-native';
import { NavigationContainer } from '@react-navigation/native';
import { createBottomTabNavigator } from '@react-navigation/bottom-tabs';
import HomeScreen from './screens/HomeScreen.js';
import StatisticsScreen from './screens/StatisticsScreen.js';
import SettingsScreen from './screens/SettingScreen.js';
import Icon from 'react-native-vector-icons/Ionicons';
const Tab = createBottomTabNavigator();

export default function App() {
  return (
    <NavigationContainer>
      <Tab.Navigator
        screenOptions={({ route }) => ({
          tabBarIcon: ({ focused, color, size }) => {
            let iconName;

            if (route.name === '메인') {
              iconName = focused ? 'beer' : 'beer-outline';
            } else if (route.name === '통계'){
              iconName = focused ? 'podium' : 'podium-outline';
            } else if (route.name === '설정'){
              iconName = focused ? 'settings' : 'settings-outline';
            }

            // You can return any component that you like here!
            return <Icon name={iconName} size={size}  color={color}/>;
          },
        })}
        tabBarOptions={{
          activeTintColor: 'black',
          inactiveTintColor: 'gray',
        }}
      >
        <Tab.Screen name="메인" component={HomeScreen} />
        <Tab.Screen name="통계" component={StatisticsScreen} />
        <Tab.Screen name="설정" component={SettingsScreen} />
      </Tab.Navigator>
    </NavigationContainer>
  );
}
tabBarIcon을 이용하여 메뉴명에 따라, 원하는 이미지로 셋팅해줍니다. https://ionicons.com/ 여기에서 원하는 이미지를 찾을 수 있습니다.
-./screens/HomeScreen.js
import React from 'react';
import { View, Text } from 'react-native';
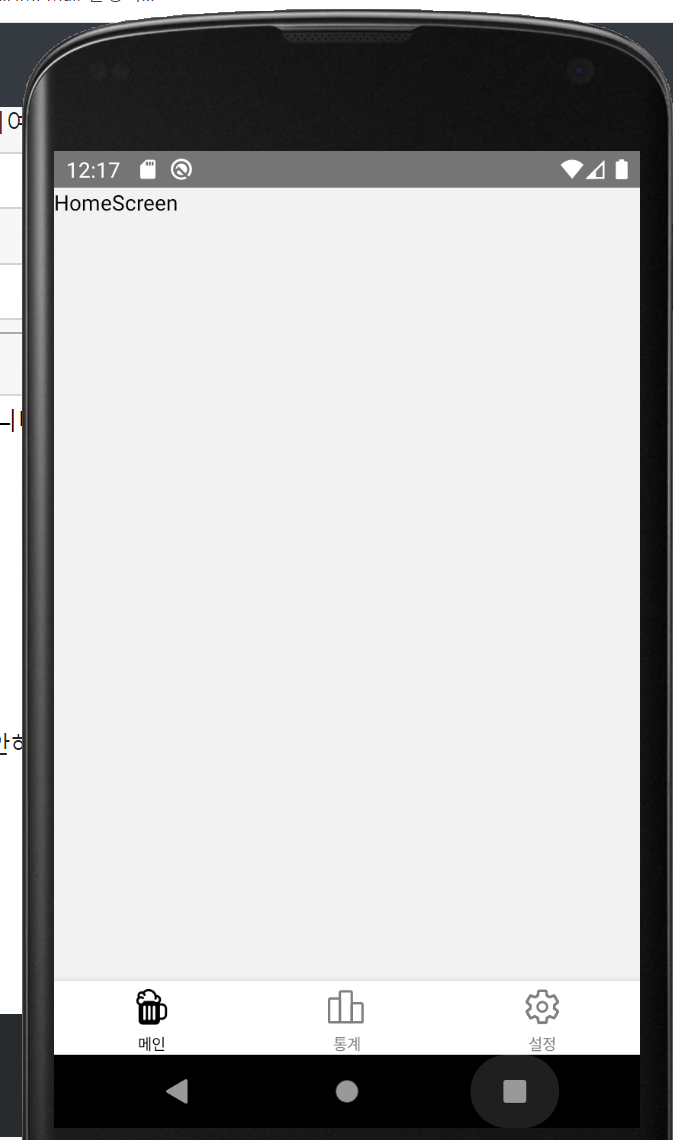
const HomeScreen = () => {
return (
<View>
<Text>HomeScreen</Text>
</View>
);
};
export default HomeScreen;
다른 화면도 동일하게 셋팅합니다 :).
-결과
ReactNative Tab Navigation 구현 DEV / REACT NATIVE
2020-07-25 posted by sang12
ReactNative로 TabNavigation을 구현하는 방법을 알아보겠습니다. (https://reactnavigation.org/docs/tab-based-navigation) 여기를 따라하면 되는데.. install 해야 하는 모듈때문에 엄청 고생했습니다 :( 간단히 테스트 하는건데.. 이글을 보고 부디 아까운 시간을 버리시는일은.. 없으면 좋겠네요 ^^;
일단 위 링크에 들어가면 npm install @react-navigation/bottom-tabs로 react navigation의 bottom-tabs의 모듈을 받으라고 합니다. 네네 해당 모듈을 받고 예제파일에있는 소스를 붙여넣으면 다른 모듈을 설치하라고 뜰겁니다. 그리고 해당 모듈을 설치하면 또 다른 모듈을... 또 설치하면 또 다른 모듈을.... 그런데, 모듈을 설치하는 과정중에 프로젝트가 깨진건지.. 뭔지.. 프로젝트가 잘 안올라 갈 때도 있습니다 ^^; 해결법을 몰라서 결국 삭제하고 다시 프로젝트 생성... 반복 OTL...(다른 블로그에도.. 설치해야할 모듈은 잘 설명이 안되어있더군요..하하)
일단 tabNavigation을 이용하려면 아래 모듈의 설치가 필요합니다.
@react-navigation/bottom-tabs
@react-navigation/native
react-native-safe-area-context
react-native-screens
npm install 명령어를 이용해 위에 모듈을 설치해줍니다. 한번에 설치하고 react-native run-android 명령어로 프로젝트를 실행해주세요
그리고 예제에 있는 소스를 넣으면 정상적으로 화면이 올라오는 것을 볼 수 있습니다 :) 이렇게 간단한걸.... 모듈 설치하는데... 시간을 많이 버렸네요.
git 소스 -> https://github.com/ChoiSangIl/react-native-navigation-test
import * as React from 'react';
import { Text, View } from 'react-native';
import { NavigationContainer } from '@react-navigation/native';
import { createBottomTabNavigator } from '@react-navigation/bottom-tabs';
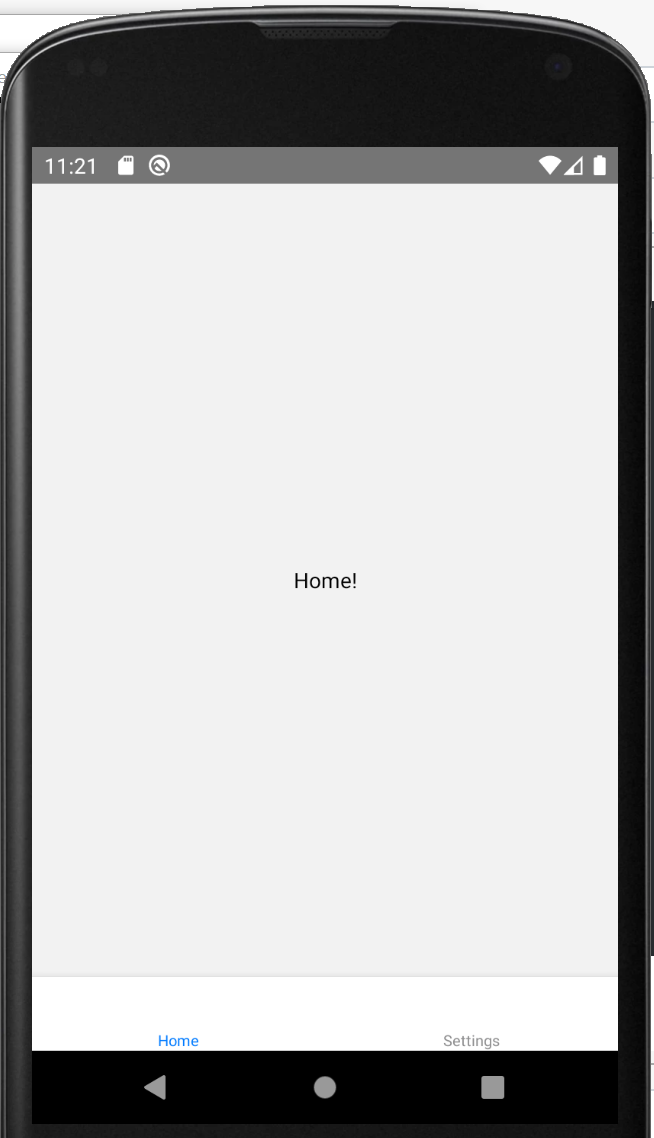
function HomeScreen() {
return (
<View style={{ flex: 1, justifyContent: 'center', alignItems: 'center' }}>
<Text>Home!</Text>
</View>
);
}
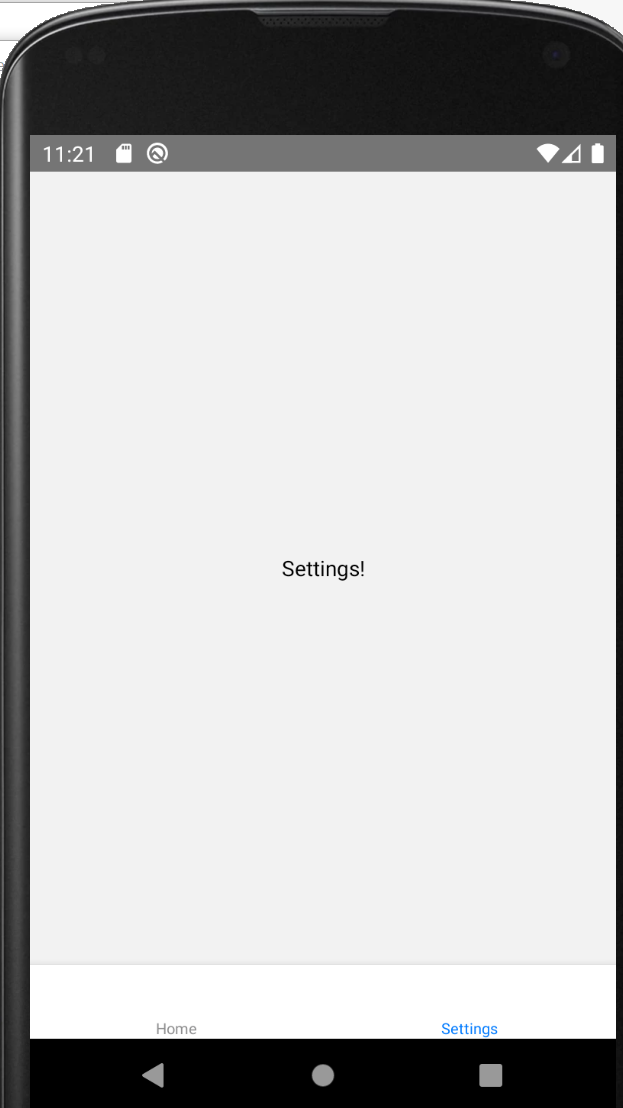
function SettingsScreen() {
return (
<View style={{ flex: 1, justifyContent: 'center', alignItems: 'center' }}>
<Text>Settings!</Text>
</View>
);
}
const Tab = createBottomTabNavigator();
export default function App() {
return (
<NavigationContainer>
<Tab.Navigator>
<Tab.Screen name="Home" component={HomeScreen} />
<Tab.Screen name="Settings" component={SettingsScreen} />
</Tab.Navigator>
</NavigationContainer>
);
}
-실행화면
reactNative 캘린더(달력) 만들기 DEV / REACT NATIVE
2020-06-17 posted by sang12
reactNative를 이용해서 달력 만드는 방법을 알아보겠습니다. 아이폰과 안드로이드를 전부 지원 할 수 있는 라이브러리를 찾았는데 여기 있네요 :) -> https://github.com/wix/react-native-calendars. 해당 깃허브를 참조하여 진행하였습니다.
github 예제 : https://github.com/ChoiSangIl/react-native-calendar-test
일단 프로젝트를 만들어야 겠죠?
npx react-native init calendarTest 명령어로 프로젝트를 생성합니다.
그리고 npm을 통해서 해당 라이브러리를 받아옵니다
$ npm install --save react-native-calendars
이제 달력을 불러와 봅시다 :).
-App.js
import React, { Component } from 'react'
import {Calendar, CalendarList, Agenda} from 'react-native-calendars';

class App extends Component {
  render() {
     return (
      <Calendar
        // Initially visible month. Default = Date()
        current={'2012-03-01'}
        // Minimum date that can be selected, dates before minDate will be grayed out. Default = undefined
        minDate={'2012-05-10'}
        // Maximum date that can be selected, dates after maxDate will be grayed out. Default = undefined
        maxDate={'2012-05-30'}
        // Handler which gets executed on day press. Default = undefined
        onDayPress={(day) => {console.log('selected day', day)}}
        // Handler which gets executed on day long press. Default = undefined
        onDayLongPress={(day) => {console.log('selected day', day)}}
        // Month format in calendar title. Formatting values: http://arshaw.com/xdate/#Formatting
        monthFormat={'yyyy MM'}
        // Handler which gets executed when visible month changes in calendar. Default = undefined
        onMonthChange={(month) => {console.log('month changed', month)}}
        // Hide month navigation arrows. Default = false
        hideArrows={true}
        // Replace default arrows with custom ones (direction can be 'left' or 'right')
        renderArrow={(direction) => (<Arrow/>)}
        // Do not show days of other months in month page. Default = false
        hideExtraDays={true}
        // If hideArrows=false and hideExtraDays=false do not switch month when tapping on greyed out
        // day from another month that is visible in calendar page. Default = false
        disableMonthChange={true}
        // If firstDay=1 week starts from Monday. Note that dayNames and dayNamesShort should still start from Sunday.
        firstDay={1}
        // Hide day names. Default = false
        hideDayNames={true}
        // Show week numbers to the left. Default = false
        showWeekNumbers={true}
        // Handler which gets executed when press arrow icon left. It receive a callback can go back month
        onPressArrowLeft={substractMonth => substractMonth()}
        // Handler which gets executed when press arrow icon right. It receive a callback can go next month
        onPressArrowRight={addMonth => addMonth()}
        // Disable left arrow. Default = false
        disableArrowLeft={true}
        // Disable right arrow. Default = false
        disableArrowRight={true}
        // Disable all touch events for disabled days. can be override with disableTouchEvent in markedDates
        disableAllTouchEventsForDisabledDays={true}
        /** Replace default month and year title with custom one. the function receive a date as parameter. */
        renderHeader={(date) => {/*Return JSX*/}}
      />
     )
   }
 }
export default App;
워매 형님 무슨 달력하나 만드는데 옵션이 저렇게도 많습니까... 생각해보니 달력에 들어가는 기능들이 많을거같긴 하네요 :). 그런데 깃허브 소스를 참고해서 저와 같이 진행을 하셨다면, 저와 같은 화면을 보고 있겠죠?. 흰화면에 이상하게 나오고 도대체 위에 달력은 어디에 있지?
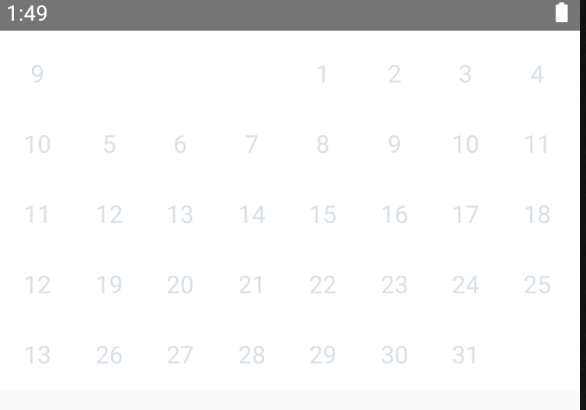
요렇게 흰화면에 흰글씨냐 뭐냐..저게 이상한게 하나 떠있을테니까요 뭔가 깔끔한 달력 화면을 원했는데 말이죠 :). 그래도 떡하니 달력하나 나오는 거지만 이쁘게 나오게 변경해봅시다.
화면이 위로올라가서 달이 안나오나..? 라는 생각에 View안에 넣어서 스타일로 paddingTop을 줘봤습니다. 하지만 여전히 달은 나오지 않았습니다.. 그래서 설정을 하나하나 변경하다보니 renderHeader를 주석처리해주니 정상적으로 나오네요. 그 외에도 current와 minDate, maxDate를 현재기준으로 변경해줬고 showWeekNumbers등을 수정해줬습니다.
-변경한 App.js
import React, { Component } from 'react'
import {View} from 'react-native';
import {Calendar, CalendarList, Agenda} from 'react-native-calendars';
import {LocaleConfig} from 'react-native-calendars';

LocaleConfig.locales['fr'] = {
  monthNames: ['Janvier','Février','Mars','Avril','Mai','Juin','Juillet','Août','Septembre','Octobre','Novembre','Décembre'],
  monthNamesShort: ['Janv.','Févr.','Mars','Avril','Mai','Juin','Juil.','Août','Sept.','Oct.','Nov.','Déc.'],
  dayNames: ['일요일','월요일', '화요일','수요일','목요일','금요일','토요일'],
  dayNamesShort: ['일', '월','화','수','목','금','토'],
  today: 'Aujourd\'hui'
};
LocaleConfig.defaultLocale = 'fr';

class App extends Component {
  render() {
     return (
      <View style={{ paddingTop: 50, flex: 1 }}>
        <Calendar
        // Initially visible month. Default = Date()
        current={'2020-06-07'}
        // Minimum date that can be selected, dates before minDate will be grayed out. Default = undefined
        minDate={'2020-01-01'}
        // Maximum date that can be selected, dates after maxDate will be grayed out. Default = undefined
        maxDate={'2020-12-31'}
        // Handler which gets executed on day press. Default = undefined
        onDayPress={(day) => {console.log('selected day', day)}}
        // Handler which gets executed on day long press. Default = undefined
        onDayLongPress={(day) => {console.log('selected day', day)}}
        // Month format in calendar title. Formatting values: http://arshaw.com/xdate/#Formatting
        monthFormat={'yyyy MM'}
        // Handler which gets executed when visible month changes in calendar. Default = undefined
        onMonthChange={(month) => {console.log('month changed', month)}}
        // Hide month navigation arrows. Default = false
        hideArrows={true}
        // Replace default arrows with custom ones (direction can be 'left' or 'right')
        renderArrow={(direction) => (<Arrow/>)}
        // Do not show days of other months in month page. Default = false
        hideExtraDays={true}
        // If hideArrows=false and hideExtraDays=false do not switch month when tapping on greyed out
        // day from another month that is visible in calendar page. Default = false
        disableMonthChange={true}
        // If firstDay=1 week starts from Monday. Note that dayNames and dayNamesShort should still start from Sunday.
        firstDay={1}
        // Hide day names. Default = false
        hideDayNames={false}
        // Show week numbers to the left. Default = false
        showWeekNumbers={false}
        // Handler which gets executed when press arrow icon left. It receive a callback can go back month
        onPressArrowLeft={substractMonth => substractMonth()}
        // Handler which gets executed when press arrow icon right. It receive a callback can go next month
        onPressArrowRight={addMonth => addMonth()}
        // Disable left arrow. Default = false
        disableArrowLeft={true}
        // Disable right arrow. Default = false
        disableArrowRight={true}
        // Disable all touch events for disabled days. can be override with disableTouchEvent in markedDates
        disableAllTouchEventsForDisabledDays={true}
        /** Replace default month and year title with custom one. the function receive a date as parameter. */
        //renderHeader={(date) => {/*Return JSX*/}}
        />
      </View>
     )
   }
 }

export default App;
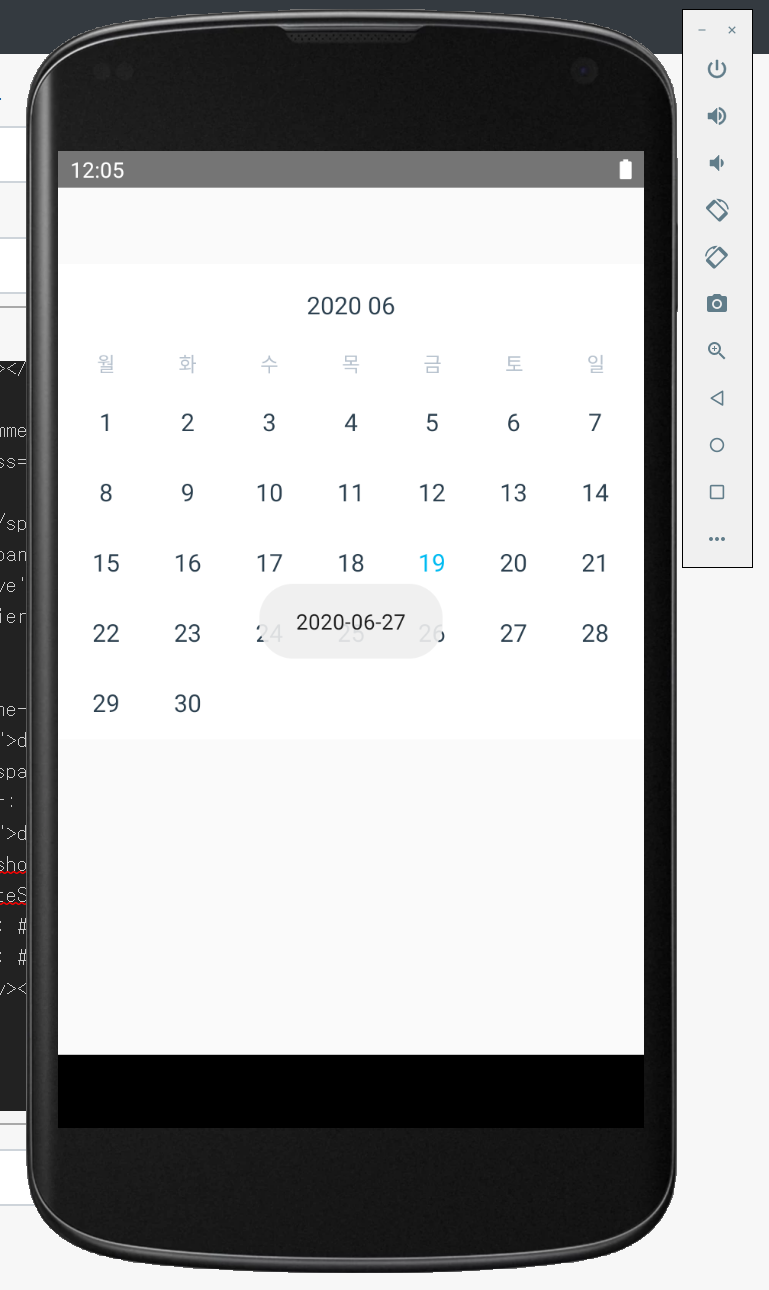
자 이제, 다시 에뮬레이터를 봅시다. 달력이 조금 더 이뻐졌군요 :). 그리고 해당 일자를 클릭하면 로그로 년도와 날자등이 나오는 것을 확인 할 수 있습니다~!
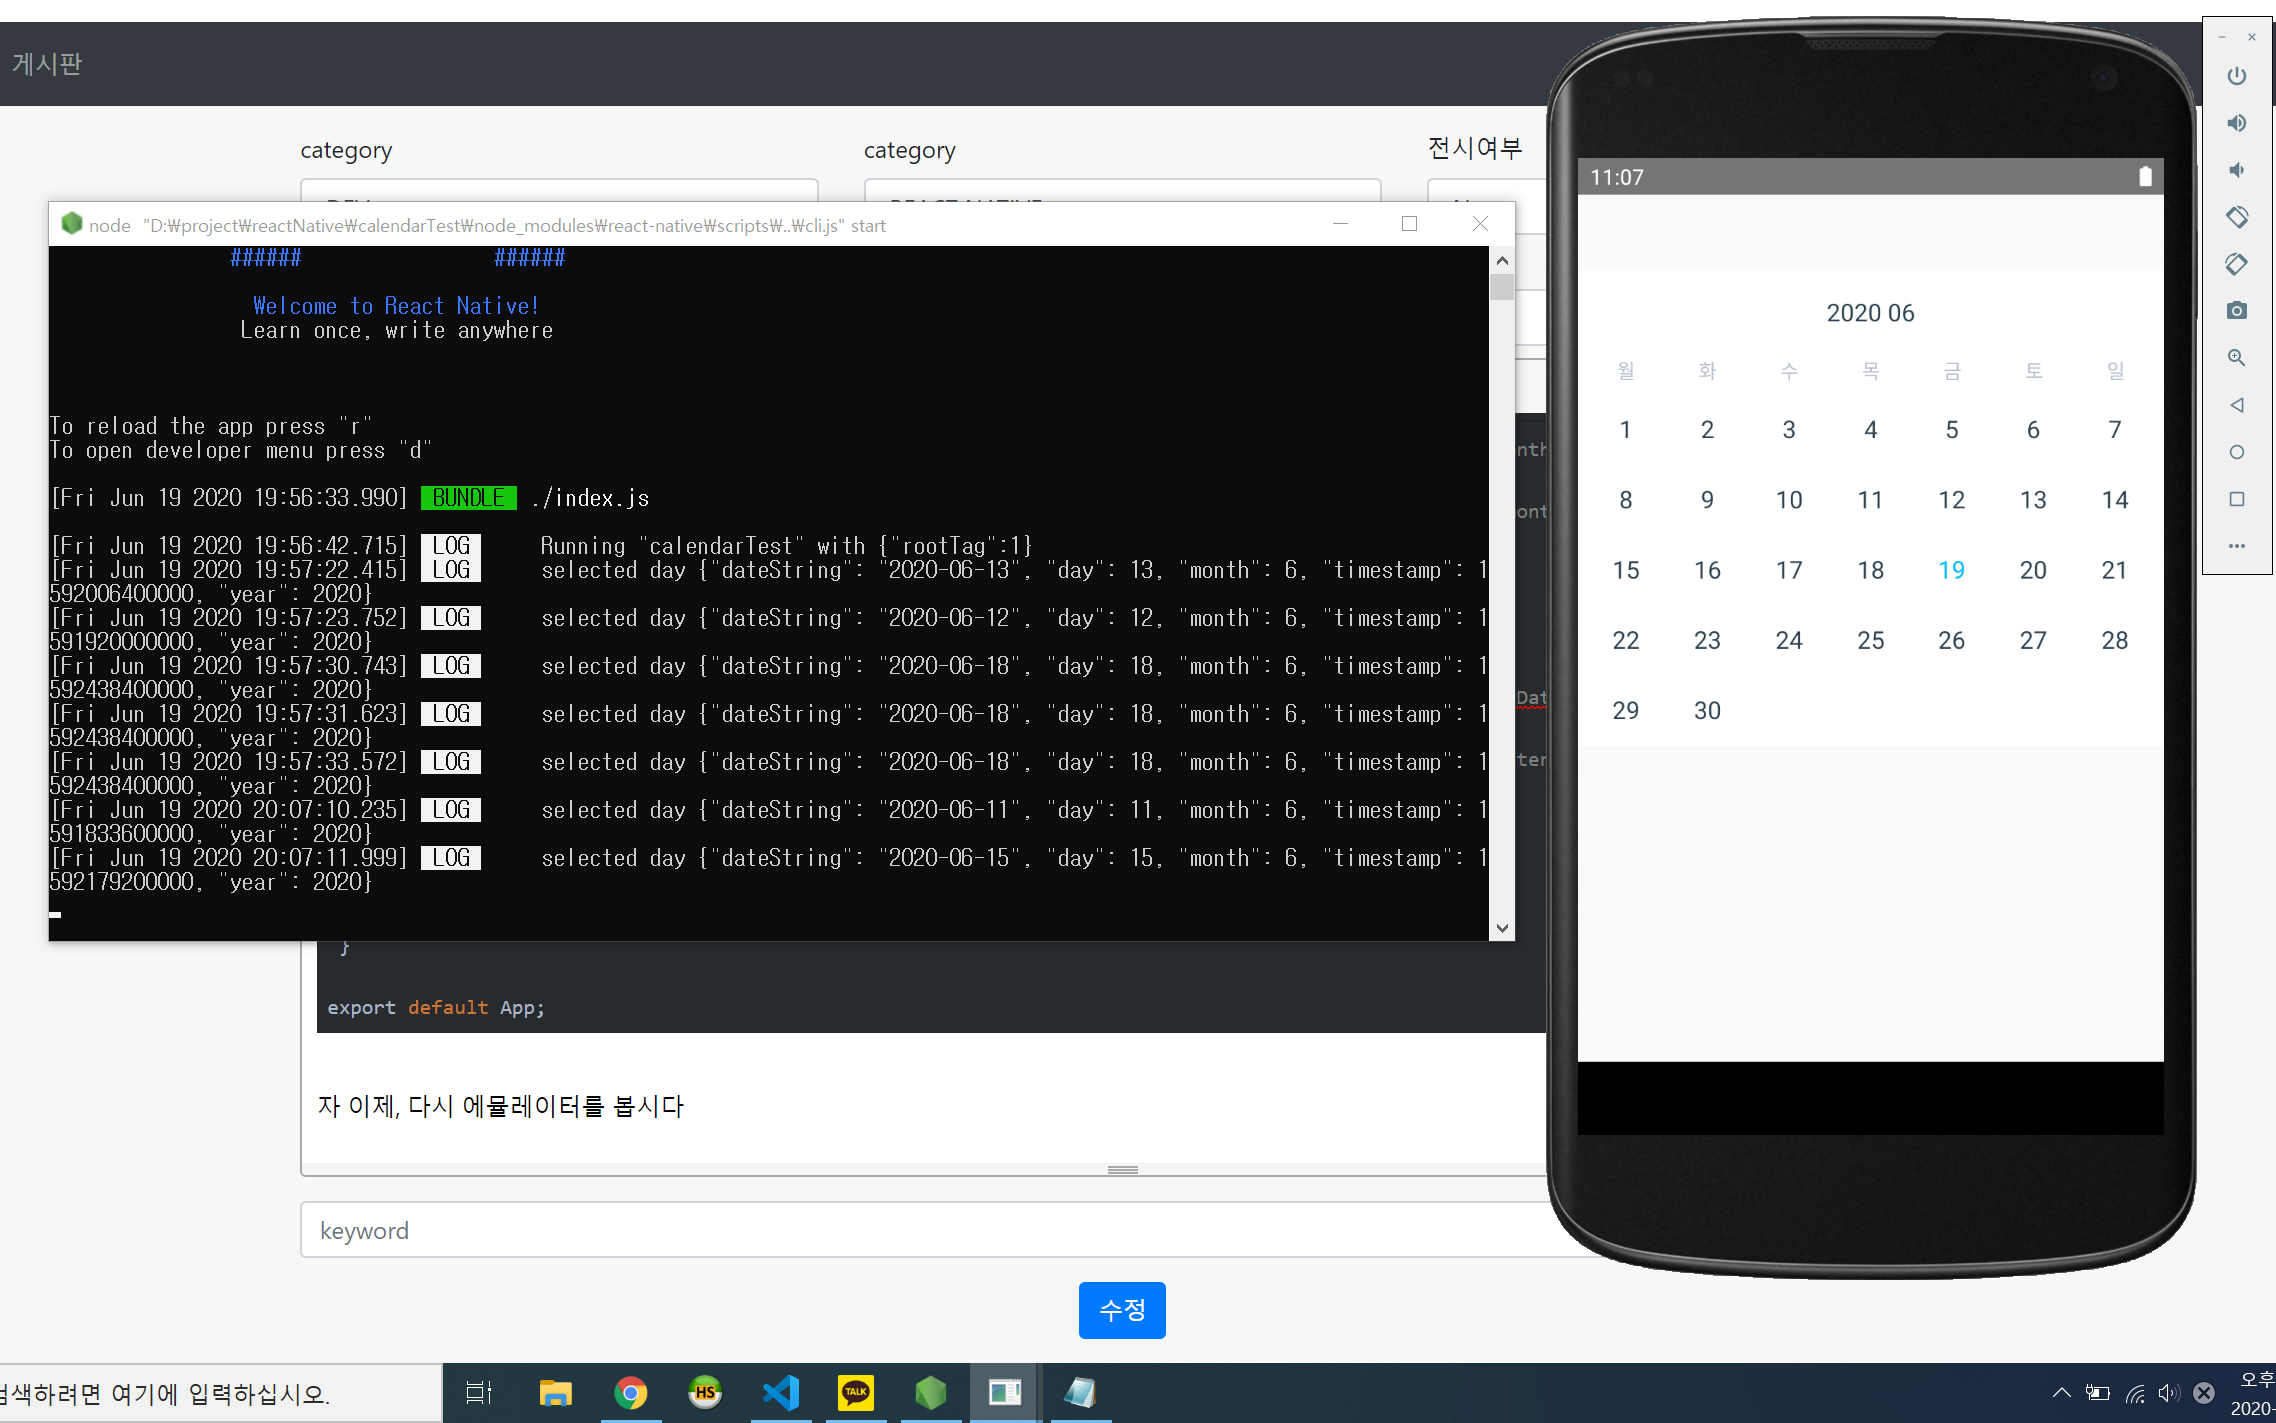
그런데 달력을 눌렀을때, 로그로만 나오니 조금 누르는 맛이 나지 않네요. toast를 이용해서 눌러진 일자를 출력해봅시다!
-App.js 수정
//ToastAndroid 추가
import {View, ToastAndroid} from 'react-native';
//..생략
//onDayPress 함수 수정
onDayPress={(day) => {    console.log('selected day', day)    ToastAndroid.showWithGravity(      day.dateString,      ToastAndroid.SHORT,      ToastAndroid.CENTER    );   }}
자 이제 일자를 눌러볼까요? 잘나오네요 :) 여기까지 reactNative에서 달력만드는 방법을 알아봤습니다.